How To Root Cuttings
Here's a quick and easy how-to for rooting most cuttings...
What you need...
A good soil-less potting mix -
- There are many different kinds on the market to choose from. I like to use one that says HP on the side, which stands for high porosity. Seeding mixes are a good choice as they tend to be higher in porosity, however, any soil less potting mix will work.
There are also some that have mycorrhizea added to them, which is a real bonus as it helps the plant make more feeder roots faster.
Some folks also use straight perlite, which is nice and porous for good root development and retains moisture well.
A good size pot to hold several cuttings -
-Generally, a 6" plastic pot is the best choice for depth and size, however, you can use smaller ones, or any vessel that is at least 4" deep and 4" wide, and has drainage holes.
Much as I adore terra cotta, they are much too porous and dry out too quickly to use for this purpose.
Exacto knife
- Comes in handy if you are working with a cutting that is rather woody and tough. Otherwise just fingers for pinching.
Pruners or shears
- For taking the cuttings from the mother plant.
Dibber/Dibble
- Or pencil, pen, stick, etc.. for making a hole to stick your cutting into.
My 'dibber' is an old green marker that I was using at the last nursery I worked at many years ago. I still use this same 'dibber' all the time. Good size for my hand, good point on it, good width. Is not pretty, is not fancy, but it works : )
Rooting Powder (optional)
- There are three types of rooting hormone
#1 for soft tissue cuttings (fuchsias, geraniums, etc..)
#2 for semi-woody cuttings ( rosemary, most houseplants and tropicals, etc... )
#3 for hard-wood cuttings ( roses, cedar, grapes, etc...)

Plastic Bag or Pop Bottle Top
- You will need a clear plastic bag that fits snugly around the top of the pot or that can be elastic banded or tied with string into place snugly. The top half of a two litre pop bottle would also create a good humidity tent, or dome over the cuttings.

1. Fill pot with potting mix, do not push it in but lightly tamp the soil in with the bottom of a drinking glass, your fingers, etc...
2. Water the pot so that the soil is damp but not soggy.
3. Use pruners to take cuttings from the mother plant. You want to have a 4" to 6" stem if possible, however some things are smaller so, take the longest that you can. Cut just below a leaf node as that is where the roots will begin to grow from.
Do not use the really woody part of the plant, but instead the side shoots, the branches, the tips, which are green and pliable ( think rosemary, geraniums, fuchsias, etc...) Do not take a cutting from a flowering tip as they will not root in, even if you remove the flower.

4. Remove all but the top two or three leaves. This is where you may need to use the exacto knife if the leaves are tough, like with a Sweet Bay Laurel. Rosemary can just be stripped carefully with your fingers and the 'leaves' used for your cooking. Geraniums and fuchsias, etc... you can just pinch the leaves off with your finger nails.
5. If the leaves are really big, you will want to cut them in half, like the Sweet Bay or Hydrangea ...
6. Cut the bottom of the stem onto an angle, this is where the exacto also comes in handy.

7. You may need to dip your stems into water in order to get the rooting hormone to stick. Then dip into the rooting hormone. I do not ever just stick the cutting into the bottle but instead put some powder into a small dish, plate, cap, lid, etc.. to avoid contamination.

8. Use your dibber to make a deep hole in the pot for the cutting. Put your cutting into the hole to just below the lowest leaf, about 1/3 to 1/2 of the cutting should be under ground. For 6 inch cuttings, place them 2 to 3 inches into the pot. Push the soil firmly into place around the stem.
You can place many cuttings into the same pot as long as they are not touching each other.

9. Water once again.
10. Cover with clear plastic bag, then tie or band into place if it does not fit snug and tight to keep in the humidity.

11. Place into a bright location, though not in direct sunlight for 2 to 3 weeks. You will likely not need to water during that time at all, but if you see that your soil looks like it might be getting dry, remove the plastic, water, and replace cover. Bottom heat speeds up the process but is not necessary.
12 In two weeks time, begin to check your cuttings carefully for rooting. Gently pull upwards on the cutting. If you meet with good resistance, it has formed good roots, slight resistance, means it is well on it's way and needs about another week, and no resistance means no roots have yet formed so re-cover and leave for another week. Do not pull so hard that the cutting comes out of the pot, just check gently for resistance.
13. When they have formed good roots, you can remove the plastic and leave until you have time to pot them up. The gently use your dibber to loosen the soil around the new root system and lift the newly rooted cutting from the pot to be replanted into it's own pot.

What you need...
A good soil-less potting mix -
- There are many different kinds on the market to choose from. I like to use one that says HP on the side, which stands for high porosity. Seeding mixes are a good choice as they tend to be higher in porosity, however, any soil less potting mix will work.
There are also some that have mycorrhizea added to them, which is a real bonus as it helps the plant make more feeder roots faster.
Some folks also use straight perlite, which is nice and porous for good root development and retains moisture well.
A good size pot to hold several cuttings -
-Generally, a 6" plastic pot is the best choice for depth and size, however, you can use smaller ones, or any vessel that is at least 4" deep and 4" wide, and has drainage holes.
Much as I adore terra cotta, they are much too porous and dry out too quickly to use for this purpose.
Exacto knife
- Comes in handy if you are working with a cutting that is rather woody and tough. Otherwise just fingers for pinching.
Pruners or shears
- For taking the cuttings from the mother plant.
Dibber/Dibble
- Or pencil, pen, stick, etc.. for making a hole to stick your cutting into.
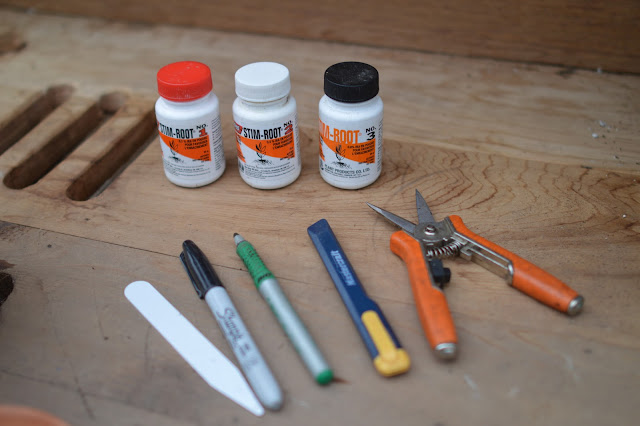
My 'dibber' is an old green marker that I was using at the last nursery I worked at many years ago. I still use this same 'dibber' all the time. Good size for my hand, good point on it, good width. Is not pretty, is not fancy, but it works : )

My tools of the trade...not pretty but they are well used and do the trick.
Rooting Powder (optional)
- There are three types of rooting hormone
#1 for soft tissue cuttings (fuchsias, geraniums, etc..)
#2 for semi-woody cuttings ( rosemary, most houseplants and tropicals, etc... )
#3 for hard-wood cuttings ( roses, cedar, grapes, etc...)

Rooting powders
Plastic Bag or Pop Bottle Top
- You will need a clear plastic bag that fits snugly around the top of the pot or that can be elastic banded or tied with string into place snugly. The top half of a two litre pop bottle would also create a good humidity tent, or dome over the cuttings.

This Sweet Bay Laurel cutting was taken 5 months ago.
See how the leaves were cut in half as they were so large?
This one has rooted and is now in it's own pot, but bay's take a really long time to start to make new leaves.
This one does however already have the new leaves forming in the crotch of the old foliage : )
How to Go About It ...1. Fill pot with potting mix, do not push it in but lightly tamp the soil in with the bottom of a drinking glass, your fingers, etc...
2. Water the pot so that the soil is damp but not soggy.
3. Use pruners to take cuttings from the mother plant. You want to have a 4" to 6" stem if possible, however some things are smaller so, take the longest that you can. Cut just below a leaf node as that is where the roots will begin to grow from.
Do not use the really woody part of the plant, but instead the side shoots, the branches, the tips, which are green and pliable ( think rosemary, geraniums, fuchsias, etc...) Do not take a cutting from a flowering tip as they will not root in, even if you remove the flower.

4. Remove all but the top two or three leaves. This is where you may need to use the exacto knife if the leaves are tough, like with a Sweet Bay Laurel. Rosemary can just be stripped carefully with your fingers and the 'leaves' used for your cooking. Geraniums and fuchsias, etc... you can just pinch the leaves off with your finger nails.
5. If the leaves are really big, you will want to cut them in half, like the Sweet Bay or Hydrangea ...
6. Cut the bottom of the stem onto an angle, this is where the exacto also comes in handy.

This Bay has smaller leaves so they do not need to be cut in half.
Cut the bottom on an angle to have more surface for the rooting powder to stick.
7. You may need to dip your stems into water in order to get the rooting hormone to stick. Then dip into the rooting hormone. I do not ever just stick the cutting into the bottle but instead put some powder into a small dish, plate, cap, lid, etc.. to avoid contamination.

Dip your stems into rooting powder and lightly tap on the side to knock off the excess.
8. Use your dibber to make a deep hole in the pot for the cutting. Put your cutting into the hole to just below the lowest leaf, about 1/3 to 1/2 of the cutting should be under ground. For 6 inch cuttings, place them 2 to 3 inches into the pot. Push the soil firmly into place around the stem.
You can place many cuttings into the same pot as long as they are not touching each other.

Geranium cuttings.. you can place in as many as want in the same pot as long as they do not touch each other.
Put them deep into the pot, to the last node.
9. Water once again.
10. Cover with clear plastic bag, then tie or band into place if it does not fit snug and tight to keep in the humidity.

11. Place into a bright location, though not in direct sunlight for 2 to 3 weeks. You will likely not need to water during that time at all, but if you see that your soil looks like it might be getting dry, remove the plastic, water, and replace cover. Bottom heat speeds up the process but is not necessary.
12 In two weeks time, begin to check your cuttings carefully for rooting. Gently pull upwards on the cutting. If you meet with good resistance, it has formed good roots, slight resistance, means it is well on it's way and needs about another week, and no resistance means no roots have yet formed so re-cover and leave for another week. Do not pull so hard that the cutting comes out of the pot, just check gently for resistance.
13. When they have formed good roots, you can remove the plastic and leave until you have time to pot them up. The gently use your dibber to loosen the soil around the new root system and lift the newly rooted cutting from the pot to be replanted into it's own pot.

Sweet Bay in front two pots have rooted in now.
Geranium cuttings in the back have begun to form new leaves.


Comments
Post a Comment