Garlic Planting How-to
This is the first year that I was able to get my hands on this
rare and endangered heirloom hardneck garlic, called Susan Delafield.
Is supposed to handle wet winters really well,
so sounds like the perfect island garlic!
Only time will tell ; )
rare and endangered heirloom hardneck garlic, called Susan Delafield.
Is supposed to handle wet winters really well,
so sounds like the perfect island garlic!
Only time will tell ; )
When to plant garlic?
In the PNW you can plant anywhere from mid-September to end October. Elsewhere, about 5 weeks before your first hard frost.
I have experimented over the years and found that I had the best luck with garlic that was planted during the first week of October.
25 feet long and 5 feet wide... garlic bed #1
Soil Prep
Garlic needs loose, crumbly, well-draining soil with lots of organic matter in it for it to size up well and really thrive.
Two weeks before planting, I weeded the garlic bed and ran my slicing hoe (Winged Weeder) through it several times to make sure I knocked out any germinating weed seeds.
The bed was then top-dressed with blood meal for nitrogen, bone meal for phosphorous, and chicken manure for a good source of N-P-K and organic matter.
Nitrogen provides energy for the top growth, which enables the garlic bulb to take up more nutrients from the elements. Great organic sources of nitrogen are blood meal or alfalfa.
Phosphorous makes the bulb size up well and builds a great root system for taking up nutrients from the soil. Great sources are bone meal, bat guano, or rock phosphates.
Organic matter adds all the goodies and nutrients to the soil for the bulb to use during it's 9 month growth period, plus keeps the soil loose and friable. Great organic sources are manure, compost, shredded leaves, leaf mould, seaweed and/or grass clippings.
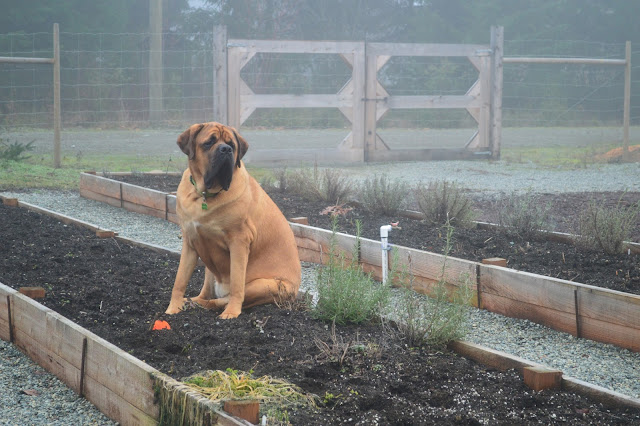
I generally just layer my goodies on top of the garden bed unless I have had the dogs dancing in the beds... 200 lb English Mastiffs will cause a wee bit of soil compaction. If this happens, I use a garden fork to gently lift and turn the soil without causing any damage.
Do not ever roto-till ... This will destroy your soil structure and all the healthy microbes, natural fungi, earthworms and such in your garden.
All the goodies were left stewin' and a brewin' for two weeks time.
Before planting, I run the Winged Weeder through the bed one more time, knocking down any weed seeds that may have germinated in the mean time. You can use a saddle hoe or whatever you have on hand.
If you did not have time to prepare your bed earlier, fear not, all is well. Soil amending can also be done right at planting time.
Just scratch your goodies into the top surface of the bed. Do not turn your soil unless you have to, or you risk bringing up all kinds of weed seeds to the surface. Garlic does not compete well with weeds for nutrients.
How to Plant
Choose several lovely varieties of organic garlic. This will help you find your favourite, the one that fares the best in your beds, in your soil, and in your region. At my wee greenhouse shop, I always bring in several different organic, BC grown varieties for folks to test in their beds. What works best for me, may not work best for you.
Choose nice big cloves to plant. Bigger cloves give you bigger bulbs, use the small ones in your cooking.
Crack open your bulb and separate the cloves at planting time, do not do this task ahead of time. Plant cloves 6 to 8 inches apart in soft, loose, friable soil, pointy side up. Leave skins on.
Push the cloves into your nice loose soil to the depth of your fingers ... so that the tip of the garlic clove is 1 to 2 inches below the soil surface.
If your soil is not loose and soft enough that you can simply push the clove in with just your fingers, you need to loosen it up with a garden fork or broad fork and add more organic matter.
The 'dimples' in the soil show the cross hatch pattern that I use to plant garlic.
Cloves are planted 7" apart and the rows are also 7" apart.
Use a rake or broom handle, stake or stick, to get nice straight rows.

Do not forget to label your garlic if you are growing more than one variety.
I use two markers... a plastic stick label (that the dogs often steal) and a mini terra cotta pot, which the dogs do not seem to be as interested in tossing about!
Softneck and hardneck
Softneck garlic does not have the strong stalk in the middle, rather is wrapped in layers around a 'heart' like artichoke leaves.
Softnecks are ready for harvest 2 weeks earlier than the hardnecks, which means around mid to end June in the PNW.
Softnecks do not make scapes, those yummy, squiggly, green tops.
Softnecks are braid-able as the foliage is soft and pliable and they do not have the hard central neck.
Softnecks are less hardy than hardnecks and should not be grown in cold climates. Here in our Zone 7 garden climate, we are lucky enough that we can actually grow both!
How yummy do these softnecks look, eh?
I planted two types of softnecks this year... The white one is the Italian, which I have grown before, and the red is a new one for me, called Western Rose.
I was only able to get 4 bulbs to trial and am pretty excited about them! They are said to be great for areas with wet winters! Sounds like it may be the perfect softneck garlic for us here on the island.
For more information on growing softneck varieties, see HERE!
Watering
After planting your garlic, water in really well.
As dry as it has been here on the west coast this year, you would not go amiss if you put the sprinkler on a low setting and let it go for several hours to slowly soak into the soil, nice and deep.
Wait a few weeks and then mulch with 3 to 5 inches of leaves, if you wish (I do not mulch mine).
More manure can be layered on at this time with your leaves, as well, if you feel your bed needs more nutrients.
Sit back, enjoy, watch them grow. Do nothing till spring.
Happy garlic growing!


Comments
Post a Comment